Showing posts with label OPI. Show all posts

Mar 29, 2011

Back in English !!!

.


Hey ladies,


I know I haven't written here in English for a while and I'm sorry for that (I feel so rusty so please forgive me if I'll have some mistakes). I'm having a busy time and I needed to write some reviews in Hebrew, so I haven't had the time to translate all. I'm so sorry if you came by to visit and haven't found the translation you were used to L


But – Here comes to happy part – I'm back J

I have lots of things to show you and some giveaways are waiting for you and I can't wait to show you all !!! ( I just want to "warn" you that there will be a few more reviews just in Hebrew, and if you'll be interested in those products, please feel free to ask questions or to ask me to translate it for you ). Beside that, this blog will be again in both English and Hebrew.


I want to take this post to thank all of you who wrote me emails and asked about it, you know I read them all and I so appreciate it, so thank you !


Also, this is my chance to tell you all how much I missed you (a lot!) and I'm so excited to "be" with you again and I hope you are all doing well ! So tell me, what's new in your life ? Have you bought / discovered some new things lately ?

I'm adding you a picture of the last polish that I wore, the pictures is not from now but the color remained the same J


OPI - Catch Me In Your Net


Jul 27, 2010

A very sparkling haul !!!

.


I ordered this package on eBay from this seller –http://myworld.ebay.com/enchantedbeautyspot/

Great seller, he has lots of the brands I like and in reasonable prices and the package arrived quick and without any problems.

The truth is that at first I planned to order just the Seche Restore and than I remembered that I need a new file….and I just couldn't resist some polishes…..hahaha


I ordered two that I especially wanted – OPI Catch Me In Your Net and Nubar Petunia Sparkle – They are adorable ! And it turned out that they are even more stunning when you see them in your hands ! They both got into my top polishes list without even blink !

If you like the colors, you've got to have them, they are so much prettier in reality !

Since this post turned out to be too long and I didn't want it to be too heavy, I'm showing you today the first polish and tomorrow I'll show you the second one.


OPI Catch Me In Your Net – This one is from the Summer Flutter collection for summer 2010. It's hard to exactly define it but we've already agreed that these hard-to-define polishes are the most special ones, right ?

So this is a blue-turquoise with golden-green glitter. When I first saw it in the bottle it seemed to me like duochrome but I'm not sure that this would be exact to say.

I'll make it easy and say that this one looks on the nails like a very glittery turquoise, but one you can't ignore J

Two coats were enough for me here, the third coat is an option but not a must. The application went smooth and the drying time was pretty quick.


I have to say that this was impossible to capture the exact color and I feel like the pictures are not doing justice to this one - it is way more deep and turquoise than it looks, so keep that in your mind.


OPI - Catch Me In Your Net


את החבילה הזאת הזמנתי מאיביי, מהמוכר הזה - http://myworld.ebay.com/enchantedbeautyspot/

אחלה מוכר, יש לו הרבה מהחברות שאני אוהבת ובמחירים סבירים והחבילה הגיעה מהר וללא בעיות.

האמת שבהתחלה תכננתי להזמין רק את טיפות הדילול של Seche למייבש שיש לי שלהם. ואז נזכרתי שאני צריכה גם פצירה....ואז פשוט לא יכולתי להתאפק מלהזמין גם לקים.....חחחחח

הזמנתי שניים (תודו שהפגנתי יכולת איפוק יפה הפעם) שקרצו לי במיוחד – Catch Me In Your Net של OPI ו- Petunia Sparkle של Nubar – תקשיבו, אין דברים כאלו ! הם התברו כאפילו מדהימים יותר במציאות ושניהם נכנסו בלי למצמץ אפילו לרשימת הטופ לקים שלי !

אם אתן אוהבות את הצבע, אתן פשוט חייבות להזמין אותם, כי הם הרבה יותר יפים באחד על אחד !


מכיוון שזה יצא קצת ארוך ולא רציתי שהפוסט יהיה כבד מדי, אני אראה לכן את הראשון ומחר אני אראה לכן את הלק השני.


Catch Me In Your Net – הלק הזה יצא במסגרת קולקציית Summer Flutter לקיץ 2010. קשה לתת הגדרה מדוייקת לצבע הזה אבל כבר הסכמנו שצבעים שקשים להגדרה הם הכי מיוחדים, נכון ?

אז זה מעין כחול-טורקיז עם נצנצים זהובים-ירוקים. הוא היה נראה לי גם כמו דואוכרום בבקבוק, אבל על היד טיפה פחות, אז אני לא סגורה על זה שהוא נכנס גם להגדרה הזאת.....

כהגרלי, אני אפשט את ההגדרה לטובת אלו מכן שהדקויות פחות מעניינות אותן ואגיד לכן שהוא נראה על היד כמו טורקיז עם נצנצים....אבל באמת אחד כזה שאי אפשר להתעלם ממנו J


שתי שכבות הספיקו לי כאן. השכבה השלישית אוטמת עוד קצת אבל לא הייתי אומרת שהיא מאסט. המריחה קלי קלות וזמן הייבוש די מהיר.


את הצבע הזה פשוט בלתי אפשרי לתפוס במדוייק והתמונות פשוט עושות לו עוול – הוא הרבה יותר עמוק וטורקיזי במציאות אז קחו את זה בחשבון.


Jul 1, 2010

Careline No. 358 v. OPI Holiday Glow

.


I'm taking a little break from the packages for a post I've promised to one of my beloved readers, so – Meital, this post is for you !


Careline No. 358 v. OPI Holiday Glow !

For a start, I'm bringing you some pictures of these two polishes in separate and I'll say right now – they are both gorgeous to my opinion ! Please notice the fact that I didn't take the pictures of these two at the same time and with the same lightning, so the best comparison would be in the pictures I took with both of them on the same hand.


I wrote all the things I had to say on Holiday Glow in this post….


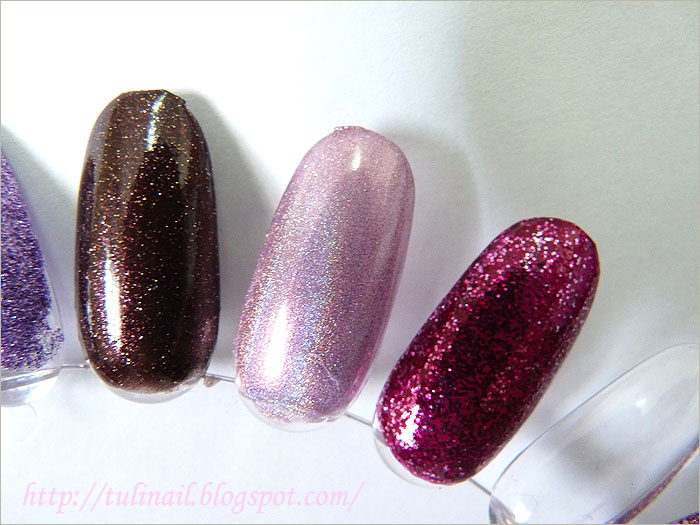
And about Careline – this one is a very rich dark brown with copper shimmer and tons of tiny copper and silver glitter. In a strong and direct light you can even see colorful glitter (I took one picture to show you this) but don't expect to see that in regular light.

The application was fine, a bit sticky but not an issue and it stayed very nice on my nails for the three days that I wore it.

It's almost opaque in the first coat and two coats will do a perfect job. Also look how glossy it is, and that's without a topcoat !


The truth is I thought these two will be more similar, but when I applied them both on one hand, I could see the differences.

Still, in a regular room light they look very similar, not dupes but very close. In sunlight it's a different story and you can really see the difference, but since we are not standing all day long with our nails in certain angle to the sun, I thought it could be interesting for you.

In the last pictures I did the comparison with the two polishes on the same hand – Careline on pinky and middle and OPI on ring and index.


Well, I told you about the similarity, so what's different ?

Careline has a copper undertone and OPI has an eggplant undertone and its glitter are bigger.


Careline was almost opaque after the first coat and 2 coats were needed for complete opacity, while OPI wasn't close to be opaque in the first coat and needed 3 coats.

Careline has a glossier finish than OPI.


Careline is slightly darker than OPI.


Application wise, I liked OPI better than Careline because of the brush, it was more comfortable for me.

Durability wise, they both held very nicely on me for 3 days.


In conclusion – I really like them both – I like the OPI's eggplant undertone and the fact that its glitter are bigger and I love Careline's glossy finish and the fact that it has more depth.

So what do you think ?


OPI - Holiday Glow


Careline - No. 358

Careline No. 358 - Colorful glitter in direct sunlight


OPI Holiday Glow v. Careline No. 358


All the last 3 pictures:
Index and ring - OPI Holiday Glow
Middle and pinky - Careline No. 358


אני אעשה הפוגה קצרה מהחבילות לטובת פוסט שהבטחתי לאחת מהקוראות האהובות שלי, אז- מיטל, הפוסט הזה הוא בשבילך !

קרליין מס' 358 v. OPI Hoilday Glow !


בתור התחלה, אני מביאה לכן תמונות של שני הלקים האלו בנפרד וכבר עכשיו אני אגיד – שניהם מהממים לדעתי ! שימו לב רק לעובדה ששני הלקים צולמו בזמנים שונים ולא באותה תאורה, אז ההשוואה הטובה ביותר תהיה בתמונות שצילמתי אותם יחד על יד אחת.


על Holiday Glow כבר כתבתי בפוסט הזה את כל מה שהיה לי להגיד.....


לגבי קרליין – מדובר על אחד מהלקים הישנים יותר של קרליין, לא מהסדרות החדשות שיצאו גם עם שמות ולכן אין שם, יש רק מספר – 358. חום כהה עם שימר נחושת והמון נצנצים קטנים כסופים ובצבע נחושת, מאוד עשיר. באור ממש חזק וישיר אפשר לראות אפילו נצנצים צבעוניים (צילמתי לכן תמונה אחת כדי להמחיש) אבל אל תצפו לראות את זה באור רגיל.

המריחה שלו היתה בסדר, טיפה צמיגית, אבל לא באופן קיצוני וגם מבחינת עמידות הוא החזיק יפה במהלך שלושת הימים שהייתי איתו. הוא כמעט אטום כבר בשכבה ראשונה ושתי שכבות יעשו כאן את העבודה כמו שצריך. תראו גם כמה הגימור שלו מבריק, וזה בלי טופקואוט !


האמת שחשבתי ששני הלקים האלו יהיו יותר דומים, אבל כששמתי את שניהם על יד אחת, ראיתי שבהחלט יש ביניהם הבדל.

בגדול, באור רגיל שני הצבעים האלה נראים די דומה, הם ממש לא זהים אבל הם מאוד קרובים. באור שמש זה כבר סיפור אחר וההבדל יותר ניכר, אבל מכיוון שרובנו לא עומדות כל היום עם הציפורניים בזוית מסוימת של שמש, ובאור רגיל הם נראים די דומה (המראה הכללי – חום כהה עם נצנצים עדינים), חשבתי שתשמחו לדעת שיש תחליף זול יותר ולא פחות יפה ללק המקסים הזה של OPI.

בתמונות התחתונות צילמתי לכן את ההשוואה בין שני הלקים - קרליין על הזרת והאמה, OPI על הקמיצה והאצבע.


אז מה דומה כבר אמרתי ועכשיו – מה שונה ?

אם אמרנו שלקרליין יש תת גוון נחושת, אז ל OPI יש תת גוון חצילי והנצנצים שלו יותר גדולים.

הלק של קרליין היה כמעט אטום כבר בשכבה ראשונה ונדרשו 2 שכבות לתוצאה מושלמת, בעוד שהלק של OPI ממש לא אטום בשכבה ראשונה וכדי להגיע לתוצאה מושלמת נדרשות 3 שכבות.

הגימור של הלק של קרליין מבריק יותר מזה של OPI.

הלק של קרליין קצת כהה יותר מהלק של OPI.

את המריחה של OPI אהבתי יותר, בעיקר בגלל המברשת, היא היתה נוחה לי יותר.

הנצנצים של קרליין קטנים יותר מהנצנצים של OPI.

מבחינת עמידות, שניהם החזיקו עליי מעמד יפה 3 ימים.


לסיכום, אני ממש אוהבת את שניהם – אצל OPI אני אוהבת את הגוון החצילי שלו ואת העובדה שהנצנצים קצת יותר בולטים. בקרליין אני אוהבת את הגימור המבריק ולצבע נראה שיש יותר

עומק והוא נראה עשיר.

אז מה אתן חושבות ?


Mar 28, 2010

לקים צבעוניים לחג !

.


ההכנות לחג בעיצומן והזמן אוזל, אז היום אני אראה לכן את הסווטצ'ים על גלגלי ציפורניים – מקובל עליכן, נכון ? J

אז קודם כל, הבטחתי שאני אראה לכן כמה לקים צבעוניים וחגיגיים לחג והבטחות צריך לקיים !

היה לי ממש קשה לבחור הפעם, כי באמת יש כל כך הרבה יפים, אבל בסופו של דבר בחרתי כמה שהם גם מיוחדים בעיניי וגם מתאימים לאווירת חג. בנוסף, בחרתי לקים שאמנם לא השגתי בארץ, חוץ מאחד, אבל את כולם (חוץ מהסאלי הנסן, שלגביו אני לא סגורה) אפשר להזמין לארץ מטראנסדיזיין או מאתרים אחרים.

בנוסף, אני מראה לכן כמה דוגמאות לפרנץ' מניקור עם נקודות פולקה שעשיתי על גלגל הציפורניים – כבר הבנתן שבא לי על פרנץ' בחג הזה, לא ? חחחח

עשיתי את זה ביד חופשית, כך שזה לא הכי מדוייק, אבל זה בעיקר כדי שתוכלו לקבל רעיונות לשילובי צבעים J

מקווה שתהנו ו......מחר אני אציג בפניכן את המניקור שלי לחג !


שמות הלקים מפורטים מתחת לתמונה:


L to R:

China Glaze Raspberry Festival
China Glaze Ruby Pumps
China Glaze Emerald Sparkle
Sally Hansen Celeb City
Color Club Tru Passion
OPI Holiday Glow
OPI DS Amethyst
Le Chat Disco Flares


I'm in the middle of preparations for the holiday and time is running out, so today I'll show you the swatches on the nails wheels, if it's o.k. with you J

So first, I promised to show you some colorful and festive polishes for the holiday and promises should be kept !

It was very hard for me to choose, because there are really so many stunning polishes, but eventually I chose some which are special in my eyes and also fit the holiday spirit.

Also, I show you today some examples of french manicures with polka dots I did on the wheel – I guess you've already got it that I want a french mani for this holiday …lol

I did those manicures freehand, so it's not very accurate, but I did it mainly for you to get ideas for colors combinations J

I hope you enjoy it and…….tomorrow I'll show you my mani for the holiday !

Mar 27, 2010

Red for the holiday !

.


אי אפשר גם בלי אדום, נכון ? J

אז הנה עוד רעיונות לציפורניים שלכן לחג !

העיצוב הראשון הוא פרחוני ואביבי – הוא מקורי יותר ומרענן והקטע שלצערי לא הצלחתי להעביר בתמונות כמו שרציתי – הוא ממש כיפי ! כן, לא יכולה להסביר, ובטח אני אשמע לכן קצת מטורללת, אבל הוא הרגיש ממש "קליל" וכיפי על היד J

עשיתי פרנץ' רגיל בעזרת המדבקות והלק הלבן של אורלי מערכת הפרנץ' וכשזה התיייבש, הוספתי לו פרחים בעזרת ערכת החותמות של קונאד. השתמשתי בפלטה M3, בלק הלבן של קונאד לפרחים הלבנים וב – Malaga Wine של OPI לפרחים האדומים ( צבע מדהים בפני עצמו !).

גם הפעם בחרתי להראות לכן משהו אחר בקמיצה, באותו סגנון, ואפשר לעשות אותו על כל האצבעות או רק על אצבע אחת, לבחירתכן. על הקמיצה מרחתי את הלק הלבן של אורלי כבסיס ועליו החתמתי את הפרחים כמו בשאר האצבעות. אח"כ הוספתי גם כמה בלינגים ירוקים להשלמת המראה האביבי הטרי.

מעל הכל השתמשתי רק במייבש שקוף, אבל שימו לב – בשתי האצבעות הראשונות ההחתמה עוד לא היתה יבשה לגמרי ואתן יכולות לראות שהיא קצת נהרסה. חיכיתי עוד כמה דקות ורק אז המשכתי על שתי האצבעות האחרות ואתן יכולות שזה נראה הרבה יותר טוב, אז שימו לב לזה כשאתן עושות דוגמאות מהסוג הזה, כי יהיה חבל להתחיל את הכל מהתחלה J


ואי אפשר בלי לק אדום קלאסי, נכון ? אני מניחה שתראו הרבה ציפורניים אדומות בליל הסדר, אבל לא אצלי כנראה....מה שכן, רציתי להראות לכן אופציה מעניינת יותר ללק האדום הרגיל והוספתי לו לבבות. לדוגמא הזאת הוספתי בכל האצבעות אבל כמובן שאפשר להוסיף רק באצבע אחת אם רוצים את המראה הנקי יותר וכמובן שזה יכול להיות כל דבר אחר ולאו דווקא לבבות – פרחים, כוכבים וכו'.

הלק האדום שהשתמשתי בו הוא Essie Queen of Hearts מקולקציית היהלומים המצומצמת של Essie– אדום מקסים במרקם קרמי (אפשר להגיד אדום בהיר ? אם כן, אז זה מה שהוא...חחח) בבקבוק ממש אפשר לראות את אבקת היהלומים, למרות שעל הציפורניים לא הצלחתי להבחין בזה. המריחה שלו מעולה ושתי שכבות מספיקות בהחלט !

להחתמה השתמשתי בפלטה M3 של קונאד ובלק הלבן של קונאד.

מכיוון שמיהרתי לצלם, לא הוספתי טופקואוט הפעם אבל אני יכולה להגיד לכן שעם הטופקואוט זה נראה אפילו עוד יותר טוב.

הערה קטנה ממני – לדעתי הלק הזה והעיצוב הזה היו נראים הרבה יותר טוב על ציפורניים טיפה יותר קצרות. לאו דווקא קצרות בהרבה, אבל יותר קצרות מהאורך הזה, זאת בכל אופן היתה ההרגשה שלי. השארתי את הציפורניים שלי באורך הזה לחג, כי הפרנץ' נראה ממש טוב עליהן באורך הזה ומאוד מתחשק לי פרנץ' לחג, אבל רציתי להראות לכן גם את הדוגמא הזאת J


You can't go without some red, right ? J

So here are more ideas for your nails for the holiday !


The first manicure is springy and flowered - it's fresh and really fun. Yap, I can't explain it, and I probably sound a bit crazy, but it felt so "light" and fun on my nails J

I did the usual french mani with the white polish from Orly French manicure kit and then I added some flowers with Konad. For the white flowers, I used Orly white polish and for the red flowers, I used OPI Malaga Wine (an amazing color on its own !)

This time also, I chose to show you something different on the ring finger, in the same style, and you can do it on all nails or just on one, as you want. On the ring I use Orly white polish as a base and than added the red flowers like I did on the other fingers. Then I added some green blings, to complete the fresh springy look.

Above all I used only clear topcoat this time – you can see in the first two fingers that the stamping was a bit ruined because I didn't wait long enough before I applied the topcoat. I then waited a few more minutes and applied the topcoat on the other two nails and you can see it looks much better, so pay attention to that when you do manicures like that, you won't want to start it all over….:-)

And how can you do without a classic red ? I guess you're going to see lots of red nails in this holiday, but not on me….I did want to show you a more interesting mani for the usual red polish and I added hearts to it. For this mani, I added the hearts on all my nails, but if you want a cleaner look, you can add it just on one nail.

I used Essie Queen of Hearts from Essie Loves Diamonds collection– gorgeous red polish in a crème texture (can you say a light red ? if so, that what it is…lol) in the bottle you can actually see the diamond dust, but I didn't see it on the nails. Its application is superb and 2 coats will do the work !

I used Konad M3 plate and Konad special white polish for stamping.

I was in a rush to take the pictures so I didn't add topcoat, but I can tell you it looks even better with topcoat.

Small note from me – I think this polish and this design would look much better on shorter nails, not much shorter, but a bit shorter than this. I wanted to leave my nails in this length for the holiday, because the french mani looks really good on them in this length and I'd like to do a french mani for the holiday. I just wanted to show you this mani too J


Mar 25, 2010

More manicures for Passover !

.


הנה עוד שני רעיונות למניקור לחג –

לפני שאני מתחילה אני רוצה רק להבהיר שכל העיצובים עם הפרנץ' מניקור פשוט לא מצטלמים משהו. ניסיתי המון וזה פשוט לא יוצא. כולם נראים הרבה הרבה יותר טוב במציאות, בהתחייבות, אז קחו את זה בחשבון J

המניקור הראשון הוא עליז ושמח – בשביל הפרנץ' הורוד השתמשתי ה- Funny Face של Essie שהוא אחד הורודים המתוקים לדעתי, בסגנון ורוד ברבי, לכיוון הפוקסיה. נמרח מצויין ומעולה לפרנץ' – שכבה אחת דקה וזה מספיק לפרנץ' אטום !

לנקודות השתמשתי בלק הלבן לפרנץ' של אורלי (כל לק לבן אטום יעשה את העבודה) ובמנקד, שבעזרתו עשיתי את הנקודות – למי שלא מכירה, צירפתי תמונה של מנקדים – אני משתמשת בהם גם לנקודות וגם בשביל להדביק אבנים.

מעל הכל מרחתי את Mademoiselle של Essie – ורוד חלבי עדין מאוד, מתאים לפרנץ', אם כי הייתי מעדיפה אחד טיפ טיפה פחות חלבי. הלק הזה חיבר את כל הצבעים והפך אותם לקצת יותר חלביים ועדינים. אם אתן רוצות שהניגוד במניקור יבלוט יותר, עדיף להשתמש בלק שקוף.

את הקמיצה עשיתי בצבעים הפוכים, כדי שתוכלו להתרשם מהמראה ההפוך ולהחליט בעצמכן מה אתן מעדיפות, למרות שגם ככה זה מדליק J


המניקור השני הוא קלאסי יותר – השתמשתי בפלטת חותמות B56 של פרנצ'ים שקניתי בוואו. הדוגמאות בפלטה מקסימות ויוצאות מצויין, רק לקח לי זמן להתאמן על להניח אותן בצורה ישרה על הציפורן ועדיין יש על מה להתאמן....אבל האימון לגמרי שווה את המאמץ כי יוצא פרנץ' מדהים ומיוחד שנראה ממש מקצועי ומדוייק.

לפרנץ' השתמשתי בלק הלבן של קונאד ומעל הכל מרחתי את Mod Hatter של OPI שהוא אחד החביבים עליי – קשה לי לתאר אותו כי בבקבוק הוא נראה מעין מוקה ורדרד בהיר מאוד ושימרי, אבל על הציפורניים הוא נראה כמעט שקוף לגמרי, מאוד מאוד טבעי ועם ברק עדין. מתאים מאוד למי שרוצה לק "בלתי נראה" אבל שמקנה מראה של ציפורניים מטופחות.

הוא עידן את הפרנץ' ונתן לו מראה מאוד טבעי, יותר לכיוון החום (הטבעי) ופחות לכיוון הורוד, אם אתן מבינות למה אני מתכוונת...


Here are two more ideas for manicure for the holiday.

Before I start, I want to let you know that all the designs with the french manicure just don't turn out so good in the pictures, they all look much much better in reality, so take it into consideration.

The first mani is happy and cheerful – for the pink tips I used Essie Funny Face which is one of the sweetest pinks for my opinion, Barbie style toward fuchsia. Great application and perfect for french – one thin coat and you got an opaque french tips !

For the dots I used Orly white polish from the French kit (any opaque white will do the job) and a dotter – I use the dotter to make dots and to pick rhinestones and if you don't know this tool, I added a picture of my dotters.

Above all I applied Essie Mademoiselle – very delicate milky pink, good for French, although I'd rather it to be just a bit less milky. This polish connected all the colors and made them a bit more delicate. If you want more contrast, use a clear polish.

I made the ring finger with the opposites colors so you can decide what way you like best, even though I think it looks cool this way too J


The second manicure is more of a classic – I used a stamping plate B56 I bought here at "Wow Cosmetics". The images in this plate are beautiful and they turn out great, it just took me some time to practice on how to place the image straight on my nails, and I still need to practice….but it's totally worth it because you get an awesome and special french mani.

For the tips I used Konad special white polish and above all I used OPI Mod Hatter which is one of my favorites – it's hard for me to describe it because in the bottle it looks kind of shimmery pinkish mocha, but on the nails it looks almost clear, very natural with light shimmer.

It gave this mani a very delicate look, more toward the brown (natural) than the pink, if you know what I mean…..


Mar 7, 2010

OPI Holiday Glow

.


הלק היום הוא אחד מהלקים שקיבלתי בחבילה מניקול המקסימה – רציתי אותו מהרגע שראיתי שאותו לראשונה והייתי כל כך שמחה כשמצאתי אותו בחבילה ממנה !

אז הנה הכרות רשמית – OPI Holiday Glow מקולקציית החגים 2009 של OPI – הוא מעין חום כהה על בסיס אדמדם, אולי אפילו אפשר להגיד קצת חצילי...טוב, אתן כבר יודעות שלפעמים קשה להגדיר במדוייק את הגוון של חלק מהלקים, אבל זה בעצם מה שהופך אותם לכל כך מיוחדים, לא ? אז זה בהחלט נכנס אצלי להגדרה של מיוחד ! ולמי שרוצה את ההגדרה השטחית יותר – בגדול הוא נראה חום כהה עם נצנצים J

יש בו המוןןןןןן נצנצים קטנים וזהובים שבהחלט נותנים כאן את הטוויסט והכל ביחד יוצר מראה מקורי, חגיגי ומהמם !


מבחינת המריחה, יש כאן צורך בשלוש שכבות כדי להגיע למראה שבתמונות. למי שקשה לה עם זה, הוא נראה טוב ואטום גם בשתי שכבות, אבל לדעתי השכבה השלישית מביאה למראה המושלם. זמן הייבוש בין שכבה לשכבה הוא די מהיר, כך שמבחינת זמן זה לא ממש קריטי.

מה שממש אהבתי בלק הזה, מלבד זה שהוא מהמם בפני עצמו, זה שאין לי עוד לק שדומה לו. אין לי בכלל גוון שנראה כמו זה בכל האוסף שלי וזה ממש כיף למצוא צבע חדש, כזה יפה ועוד עם נצנצים.....חחחח

ובנוסף, הוא מסוג הלקים שמתאימים לי גם כשאין לי חשק למשהו צעקני מדי, ובאותו זמן, הוא מתאים גם כשבא לי משהו דרמטי יותר לערב....


לסיכום - אני ממש אוהבת את הלק הזה J


OPI - Holiday Glow


Today's polish is another one of the polishes I've received from the lovely Nicole – I wanted this one from the moment I first saw it and I was so happy to find it in the package from her !


So here's a formal introduction - OPI Holiday Glow from OPI Holiday Wishes Collection 2009 – this is a dark brown with reddish base, maybe I could say even a little eggplant... well, you already know that sometimes is difficult to define precisely the shade of some polishes, but that is what makes them so special, isn't it ? So it certainly came into my definition of special! For those who want the more superficial definition - it looks like a dark brown with glitter J

It has tonsssss of gold glitters and it certainly gives the twist here and all together creates an original look, festive and stunning!


Terms of application, you'll need 3 coats to get the look you see in the pictures. It also looks good and opaque with two coats, but I think the third coat provides the perfect look. Drying time between layers is quite fast, so in terms of time it's not really critical.


What I really liked about this polish, except it's amazing as itself, is that I don't have another similar polish like that. I have no shade that looks like this in my entire collection and it's really fun to find a new color, so beautiful and with glitter ..... lol

Plus, it is one of the polishes that fit me well when I don't want something too loud, and at the same time, it fits well when I want something more dramatic for the evening ....


In conclusion - I really love this polish J


Thank you Nicole !


Jan 28, 2010

Tuli's Romantic Giveaway for Valentine's Day

.


הגיע הזמן למתנה הרומנטית שלי !!!


הולנטיינ'ס מתקרב וזאת היתה ההזדמנות שלי להכין לכן חבילה שכבר מזמן רציתי להכין -

חשבתי על רומנטי.....חשבתי על אדום....חשבתי על מתוק......וזה מה שיצא - המתנה הרומנטית שלי אליכן לולנטיינ'ס, שתישלח אל אחת מהקוראות האהובות שלי עם המון אהבה J


הזמנתי מטראנסדיזיין 4 לקים אדומים שבחרתי אחד אחד אחרי המון לבטים – כל אחד בגוון שונה – יש אדום במרקם קרמי ואדום עם שימר, אדום עם נצנצים ואדום שימרי כהה יותר – וכולם מדהימים לדעתי. צירפתי גלוסים שישלימו את המראה ושוקולדים שישלימו את האוירה ואם הייתי יכולה לשלוח גם יין, הייתי מצרפת גם את זה, אז.....היין עליכן J

את הפירוט המלא של הדברים תוכלו למצוא בהמשך.


אז מה צריך לעשות כדי לזכות במתנה ?


  1. יש להיות רשום כ- Follower לבלוג שלי.אפשר לעשות זאת ע"י לחיצה על הלחצן "Follow" בצד ימין של המסך (לקראת האמצע של העמוד). לכל מי שכבר רשומה לבלוג שלי, אני רוצה להודות שוב ולשלוח תודה ענקית על התמיכה <3. ולכל מי שעכשיו מצטרפת – ברוכה הבאה ואני מאוד מקווה שתהני לקרוא כאן בפינה החמה שלי J

2. אחרי שנרשמתן כ-Follower, או אם אתן כבר Follower, כתבו לי תגובה בתחתית הפוסט הזה וציינו בה את כתובת המייל שלכן, שאליה אני אשלח את מייל הזכיה במידה ותזכו. תגובה לפוסט תזכה אתכן בכניסה להגרלה (1).

3. בשביל כניסה נוספת - במידה ויש לכן בלוג, פרסמו בו את ה- Giveaway שלי עם התמונה הראשונה שצירפתי לכאן, עם קישור לפוסט הזה. בתגובה שלכן, צרפו את הקישור לפוסט שלכן שבו פרסמתן את ההגרלה - קישור כזה יזכה אתכן בכניסה נוספת להגרלה (2).

4. בשביל כניסה נוספת – צרפו את הבלוג שלי לרשימת הבלוגים שאתן קוראות (blogroll). צרפו את הקישור לבלוג שלכן לתגובה לפוסט הזה - קישור כזה יזכה אתכן בכניסה נוספת. אם אני כבר מופיעה ברשימת הבלוגים שלכן, אתן גם יכולות לזכות בכניסה נוספת, רק תיידעו אותי על כך (3).

5. בשביל כניסה נוספת – הצטרפו אליי כ- Follower לטוויטר. רק תדאגו לכתוב לי את זה בתגובה שלכן, כדי שאני אדע להחשיב את זה ככניסה נוספת (4).


אז הפעם, לכל אחת יש הזדמנות לזכות במקסימום 4 כניסות להגרלה.


אפשר להיכנס להגרלה עד ל- 14.2.10 בשעה 08:00 בבוקר. ב- 14.2.2010 בערב אני אגריל את הזוכה בעזרת המחשב מבין כל השמות המשתתפים ואודיע על הזוכה במתנה ! ההגרלה פתוחה לכל הקוראות מכל העולם J


מקווה שתהנו ו......בהצלחה ! J


My Romantic Giveaway includes:

1. I Love You gift box.

2. 4 OPI polishes - Comet Loves Cupid, Meet & Jingle, Crimson Carol and Log On To Love

3. Pomegranate Shower Gel (full size).

4. Pomegranate Peeling Soap (full size).

5. Heart designed nail file.

6. 2 "Careline" glitter Lip Glosses.

7. Heart shaped Belgian Chocolates.

8. I Love You candy.

9. Some more goodies….:-)


It's time for my Romantic Giveaway !!!


Valentine's Day is coming and that was my chance to make for you a package that I've wanted to make for a long time – I was thinking romantic….I was thinking red….I was thinking sweet……and that is what turned out – my romantic giveaway for you for Valentine's Day, which will be sent to one of my beloved readers with lots of love J


I ordered from Transdesign 4 red polishes that I carefully chose – each one is a different kind of red – there is a crème red, shimmering red, glitter red and one darker shimmering red – and they are all amazing for my opinion. I added two Lip Glosses to complete the look and some chocolates to complete the feeling and if I could add some wine, I would have added that too, so…..the wine is on you J

You can find the full description above.


The rules are simple:


1. You must be a follower.

2. Leave me a comment in this post and write me your e-mail address. This would be 1 entry. (1)

3. For an extra entry –Mention this giveaway in your blog and add my first picture here. In your comment here, please add me a link to your post.(2)

4. For another extra entry – add my blog to your blogroll and send me a link in your comment.(3)

5. For another extra entry - Follow me on Twitter. Just please make sure to write me that in your comment so I'll know to count an extra entry for you (4).

Overall, you can win 4 entries to this giveaway.


This giveaway is open to all of my followers – International included !


You can enter this giveaway until 14.2.10 08:00 AM Israel time (here is a link to time zone converter ).I'll do a random draw and announce the winner on 14.2.2010 in the evening !


Hope you'll have fun and … good luck :-)


twitter / Tulisnailpolish

Discounts