Showing posts with label Orly. Show all posts

Aug 1, 2010

Rainbow of colors from Chocaddict

.


Today I have something special to show you !


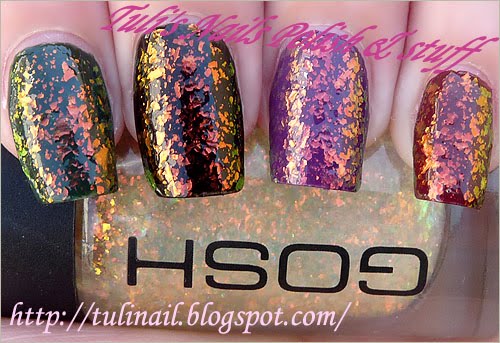
I received Gosh Rainbow in the package from the wonderful Chocaddict and even before I saw it, I knew I'm going to love it.


This is a clear base with lots of massive duochrome flakies in colors of orange-yellow-green and one coat of it over any polish, changes it completely. Absolutely stunning !

It's popular to lay this polish over black for maximum effect, but I've decided to do a little experiment and show it to you over several dark crème polishes, so you can see it in different ways. As I wrote, all you need is one layer of this polish and everything changes. As thick as the layer would be, as bigger the amount of flakies that would cover the base color will be.

And now to the experiment:

As a base, I used 4 different colors and I took you some "before" pictures so you can see them "clean" (also these are some of my favorite crèmes so you can take a recommendation on them all on the way):


Index - Orly Enchanted Forest

Middle – Chic No. 32

Ring – Misa Sorry Just Can't Help It

Pinky – Misa Can't Nobody Take Me Down

I applied a layer of Rainbow over then and here are the results ! I loved it the most over the black and the purple J

This one definitely joins my most special polishes list !

So, what do you think ?

And of course – Thank you soooooooo much Chocaddict ! I love it !


Index - Orly Enchanted Forest

Middle – Chic No. 32

Ring – Misa Sorry Just Can't Help It

Pinky – Misa Can't Nobody Take Me Down


היום יש לי משהו מיוחד להראות לכן !

את הלק הזה של Gosh שנקרא Rainbow קיבלתי בחבילה מ- Chocaddict המקסימה ועוד לפני שראיתי אותו, ידעתי שאני הולכת לאהוב אותו.

הלק הזה הוא בעצם לק שקוף עם חתיכות נצנצים ענקיות (המכונות Flakies) דואוכרומיות בצבעים של כתום-צהוב-ירוק ושכבה אחת שלו מעל כל לק, משנה אותו לחלוטין, פשוט מטריף !

מקובל לשים את הלקים מהסוג הזה על לק שחור לקבלת האפקט המירבי, אבל החלטתי לעשות ניסוי הפעם ולהראות לכן אותו על כמה לקים כהים בגוונים שונים, כדי שתוכלו להתרשם. כמו שכתבתי, כל מה שצריך זו שכבה אחת מהלק והכל משתנה. ככל שתשימו שכבה עבה יותר, כך כמות הנצנצים תהיה גדולה יותר וזה יכסה שטח יותר גדול מצבע הבסיס.

ונעבור לניסוי:

בתור בסיס, השתמשתי בארבעה צבעים שונים וצילמתי לכן אותם "נקיים" כדי שתוכלו להתרשם ממראה ה"לפני" (חוץ מזה שאלו חלק מהקרמיים הפייבוריטים שלי אז קבלו המלצה על כולם על הדרך):

אצבע – Enchanted Forest של אורלי

אמה – מס' 32 של שיק.

קמיצה – Sorry Just Can't Help It של מיסה.

זרת – Can't Nobody Take Me Down גם הוא של מיסה.

מעל כולם הוספתי שכבה של Rainbow והתוצאה לפניכן !

התמונות משקפות את המראה שמתקבל אבל קחו בחשבון שכל פעם שאתן מזיזות את היד, רואים צבע אחר, כי זה משתנה בהתאם לתאורה ולזויות ובאופן אישי, אני הכי אהבתי את המראה שלו על השחור ועל הסגול J

הוא בהחלט מצטרף לרשימת הלקים הכי מיוחדים שיש לי.

אז מה דעתכן ?


May 5, 2010

Mix and Match #2

.


היום אני אראה לכן שיטה מעולה למיקס אנד מאץ' שתמיד עובד !

הרעיון – לצבוע חלק מהאצבעות בלק במרקם קרמי או שימרי וחלק מהאצבעות בלק נצנצים מאותו צבע.

אני אוהבת לשים את הלק נצנצים רק על הקמיצה, אבל בהחלט אפשר לעשות את זה עם אצבע כן אצבע לא. רצוי שהנצנצים יהיו בגוון קצת יותר בהיר או מעט שונה מהלק השני ורצוי גם שהם יהיו גדולים ולא עדינים, כדי ליצור את האפקט המירבי. חשוב גם שהנצנצים יתנו מרקם אטום ולא חצי שקוף, כך שבמידה ואין לכן לק כזה, תמרחו שכבה אחת מהלק גם על האצבע עם הנצנצים ועליה תמרחו את לק הנצנצים כדי לקבל מראה אטום.

למי שאין נצנצים צבעוניים, השיטה הזאת בדר"כ עובדת טוב גם עם אצבע אחת בנצנצים כסופים או זהובים (אני יודעת שיותר קל להשיג כאלה בארץ), תלוי בצבע שאתן שמות – למשל הלק הירוק הזה, היה יכול ללכת מצויין עם לק נצנצים זהוב.

המיקס הזה הוא לא מהנועזים שיש והוא תמיד יוצר מראה עם נוכחות ועניין, לא משנה באיזה צבע אני בוחרת לעשות אותו. אני יכולה לספר לכן שתמיד השילוב הזה קוצר אצלי המון מחמאות ותמיד מאוד כיף להסתובב איתו.


הפעם בחרתי להראות לכן שילוב שאני מאוד אוהבת – ללק הירוק השתמשתי ב- Enchanted Forest של אורלי – אחד מהירוקים האהובים עליי ביותר, במרקם קרמי, אטום אחרי שתי שכבות, למרות שבתמונה אתן רואות 3 שכבות ששמתי, כדי שיהיה קצת יותר כהה.

ללק הנצנצים השתמשתי ב – Green Confetti של Claire's שהוא לא אטום לגמרי, אז שמתי אותו מעל שכבה אחת של האורלי. כאן הייתי צריכה 2 או 3 שכבות כדי לקבל את האפקט המקסימלי של הנצנצים.

והתוצאה מדהימה בעיניי !


צירפתי לכן עוד מיקס אנד מאץ' שעשיתי בזמנו לתחרות – אמנם הוא יותר מושקע ועם דוגמת מחוך, אבל תורידו את הדוגמה ותקבלו מיקס מנצח בגווני סגול – במניקור הזה השתמשתי ב – Stella של צ'יינה גלייז ללק הסגול (אחד המהממים לדעתי) וב- Carnival Lights של צ'יינה גלייז לנצנצים.


Orly - Enchanted Forest
+
Claire's - Green Confetti


China Glaze - Stella
+
China Glaze - Festival Lights


Today I'll show you a great way for mix and match that always works !

The idea – to paint some of the nails with a crème or shimmery nail polish and some of the nails with a glitter polish in the same color. I love to apply the glitter polish just on the ring finger, but you can definitely do it with two fingers with glitter.

The glitter polish should be in a lighter shade or a bit different shade from the other color and you might want the glitter polish to be a chunky one and not delicate, to create the maximal effect. It's also important that the glitter polish would be opaque and not sheer, so if you don't have a glitter polish like that, you can apply one coat of the other polish and than apply the glitter polish on it to get an opaque look.

If you don't have a colorful glitter, this way also usually works good with silver or gold glitter, depend on the other color you apply – for example, this green polish will go great with gold glitter.

This is not one of the daring mixes and it always creates a look with presence and interest, doesn't matter what color I choose to do it. I can tell you that I always get compliments when I wear this mix and it's always really fun to wear it.

This time I chose to show you a mix that I really like – for the green polish I used Orly Enchanted Forest – one of my favorite greens, in a crème texture, opaque after 2 coats, although I used 3 coats this time to make it look a bit darker.

For the glitter polish I used Claire's Green Confetti which is not totally opaque, so I applied it over one coat of the green Orly. I needed 2 or 3 coats here to get the maximal effect of the glitter.

And I think the result is stunning !


I also added another mix and match I did at the time for the contest – although it's more fancy but take down the nail art and you get a winning mix in purples shades – for this mani I used China Glaze Stella for the purple polish (a total stunner for my opinion) and China Glaze Carnival Lights for the glitter polish.


Mar 27, 2010

Red for the holiday !

.


אי אפשר גם בלי אדום, נכון ? J

אז הנה עוד רעיונות לציפורניים שלכן לחג !

העיצוב הראשון הוא פרחוני ואביבי – הוא מקורי יותר ומרענן והקטע שלצערי לא הצלחתי להעביר בתמונות כמו שרציתי – הוא ממש כיפי ! כן, לא יכולה להסביר, ובטח אני אשמע לכן קצת מטורללת, אבל הוא הרגיש ממש "קליל" וכיפי על היד J

עשיתי פרנץ' רגיל בעזרת המדבקות והלק הלבן של אורלי מערכת הפרנץ' וכשזה התיייבש, הוספתי לו פרחים בעזרת ערכת החותמות של קונאד. השתמשתי בפלטה M3, בלק הלבן של קונאד לפרחים הלבנים וב – Malaga Wine של OPI לפרחים האדומים ( צבע מדהים בפני עצמו !).

גם הפעם בחרתי להראות לכן משהו אחר בקמיצה, באותו סגנון, ואפשר לעשות אותו על כל האצבעות או רק על אצבע אחת, לבחירתכן. על הקמיצה מרחתי את הלק הלבן של אורלי כבסיס ועליו החתמתי את הפרחים כמו בשאר האצבעות. אח"כ הוספתי גם כמה בלינגים ירוקים להשלמת המראה האביבי הטרי.

מעל הכל השתמשתי רק במייבש שקוף, אבל שימו לב – בשתי האצבעות הראשונות ההחתמה עוד לא היתה יבשה לגמרי ואתן יכולות לראות שהיא קצת נהרסה. חיכיתי עוד כמה דקות ורק אז המשכתי על שתי האצבעות האחרות ואתן יכולות שזה נראה הרבה יותר טוב, אז שימו לב לזה כשאתן עושות דוגמאות מהסוג הזה, כי יהיה חבל להתחיל את הכל מהתחלה J


ואי אפשר בלי לק אדום קלאסי, נכון ? אני מניחה שתראו הרבה ציפורניים אדומות בליל הסדר, אבל לא אצלי כנראה....מה שכן, רציתי להראות לכן אופציה מעניינת יותר ללק האדום הרגיל והוספתי לו לבבות. לדוגמא הזאת הוספתי בכל האצבעות אבל כמובן שאפשר להוסיף רק באצבע אחת אם רוצים את המראה הנקי יותר וכמובן שזה יכול להיות כל דבר אחר ולאו דווקא לבבות – פרחים, כוכבים וכו'.

הלק האדום שהשתמשתי בו הוא Essie Queen of Hearts מקולקציית היהלומים המצומצמת של Essie– אדום מקסים במרקם קרמי (אפשר להגיד אדום בהיר ? אם כן, אז זה מה שהוא...חחח) בבקבוק ממש אפשר לראות את אבקת היהלומים, למרות שעל הציפורניים לא הצלחתי להבחין בזה. המריחה שלו מעולה ושתי שכבות מספיקות בהחלט !

להחתמה השתמשתי בפלטה M3 של קונאד ובלק הלבן של קונאד.

מכיוון שמיהרתי לצלם, לא הוספתי טופקואוט הפעם אבל אני יכולה להגיד לכן שעם הטופקואוט זה נראה אפילו עוד יותר טוב.

הערה קטנה ממני – לדעתי הלק הזה והעיצוב הזה היו נראים הרבה יותר טוב על ציפורניים טיפה יותר קצרות. לאו דווקא קצרות בהרבה, אבל יותר קצרות מהאורך הזה, זאת בכל אופן היתה ההרגשה שלי. השארתי את הציפורניים שלי באורך הזה לחג, כי הפרנץ' נראה ממש טוב עליהן באורך הזה ומאוד מתחשק לי פרנץ' לחג, אבל רציתי להראות לכן גם את הדוגמא הזאת J


You can't go without some red, right ? J

So here are more ideas for your nails for the holiday !


The first manicure is springy and flowered - it's fresh and really fun. Yap, I can't explain it, and I probably sound a bit crazy, but it felt so "light" and fun on my nails J

I did the usual french mani with the white polish from Orly French manicure kit and then I added some flowers with Konad. For the white flowers, I used Orly white polish and for the red flowers, I used OPI Malaga Wine (an amazing color on its own !)

This time also, I chose to show you something different on the ring finger, in the same style, and you can do it on all nails or just on one, as you want. On the ring I use Orly white polish as a base and than added the red flowers like I did on the other fingers. Then I added some green blings, to complete the fresh springy look.

Above all I used only clear topcoat this time – you can see in the first two fingers that the stamping was a bit ruined because I didn't wait long enough before I applied the topcoat. I then waited a few more minutes and applied the topcoat on the other two nails and you can see it looks much better, so pay attention to that when you do manicures like that, you won't want to start it all over….:-)

And how can you do without a classic red ? I guess you're going to see lots of red nails in this holiday, but not on me….I did want to show you a more interesting mani for the usual red polish and I added hearts to it. For this mani, I added the hearts on all my nails, but if you want a cleaner look, you can add it just on one nail.

I used Essie Queen of Hearts from Essie Loves Diamonds collection– gorgeous red polish in a crème texture (can you say a light red ? if so, that what it is…lol) in the bottle you can actually see the diamond dust, but I didn't see it on the nails. Its application is superb and 2 coats will do the work !

I used Konad M3 plate and Konad special white polish for stamping.

I was in a rush to take the pictures so I didn't add topcoat, but I can tell you it looks even better with topcoat.

Small note from me – I think this polish and this design would look much better on shorter nails, not much shorter, but a bit shorter than this. I wanted to leave my nails in this length for the holiday, because the french mani looks really good on them in this length and I'd like to do a french mani for the holiday. I just wanted to show you this mani too J


May 25, 2009

My new Orly's - Part 4 and last

.

היום אני קצת קצרה בזמן, אז תיאלצו לסלוח לי על הפוסט הקצר.

הגענו ללק האחרון בסדרה – Red Sea Pearl. אין לי מושג מאיזו קולקציה הוא, ואם מישהי מכן יודעת, אני אשמח לגלות...
הלק הזה הוא בצבע פוקסיה זוהר, מאוד זוהר בשמש, למרות שהברק שלו מורגש גם בתוך הבית, עם מעין ברק כחלחל בתוכו, שהופך אותו למיוחד ולא סתם עוד פוקסיה. יש לו מרקם מבריק וזוהר, ושקלתי אפילו להגיד ג'לי, אבל אני לא בטוחה לגבי זה, אז אל תתפסו אותי במילה...חחח

גם כאן, כל ההערות לגבי המריחה שכתבתי בפוסט הקודם תקפות לגבי הלק הזה – היה לי מ-א-ו-ד קשה למרוח אותו בצורה מדויקת מכיוון שהוא היה די דליל וניסה לברוח לי לכל הכיוונים, אבל בסופו של דבר עמדתי במשימה, ודי בכבוד :-)
הצ'ופר היה, שהוא החזיק מצויין על הציפורניים, בלי נסיגה וכו' וקיבלתי עליו המווווןןןןן מחמאות, גם ממקורות לא צפויים.....

בתמונות רואים 3 שכבות של הלק ואני חייבת לציין שבמציאות הוא קצת יותר כהה מאשר בתמונות, אבל חרף מאה הנסיונות שעשיתי, המצלמה סירבה לקלוט את זה...

בנוסף, צירפתי לכן תמונה שלו עם פרחים חמודים שהתחשק לי להוסיף עליו – חלקם באמצעות קונאד וחלקם מודבקים :-)


ORLY - Red Sea Pearl


Today I'm short in time, so you'll have to excuse me for the short post….

The last polish in this series is Red Sea Pearl (Charming nails - this is for you :-) )– I don't know which collection this one is from, but if you know, I'll be glad to find out….

This one is a shimmering fuchsia, very bright in the sun, I think I can even say glowing, with kind of blue shimmering inside, that makes it very special and not just another fuchsia. It has a very bright finish and I also want to say jelly, but I'm not sure about that…..

About the application – all the things I wrote in my last post, are right also about this one – I had a V-E-R-Y hard time applying this one accurately, since it was very runny, but eventually I succeeded in that mission pretty good :-)
The bonus was, that it stayed great on my nails, no wear off or chipping and I got ttttttoooooons of compliments on this one, and even from unexpected sources….lol

In these pictures you see 3 coats and I have to say that in real life it looks a bit darker, but although I did about 100 pics, my camera refused to catch it….

In addition, I added a picture of this one with some cute flowers I've decided to add on – some by Konad and some are flowers I bought :-)


May 23, 2009

My new Orly's - Part 3

.

האמת שהייתי בטוחה שעד עכשיו אני כבר אסיים את המיני סדרה הזאת, כי יש לי המוווווווןןןןןןןןןן דברים חדשים להראות לכן, אבל לא הספקתי השבוע לעשות את כל מה שרציתי, ולכן הדברים החדשים (ויש הרבה !!) ייאלצו לחכות עוד כמה ימים, סולחות לי, נכון ? :-)

אז הנה אני עוברת היום ללק השני בסדרה, שנקרא Golden Maharaja – אם אתן זוכרות, כתבתי כאן שבהתחלה לא קניתי אותו ויום למחרת, בהמלצה של חברה, הלכתי לקנות אותו. וכמה שאני שמחה שהלכתי !

חשבתי איך לתאר לכן את הצבע הזה.....אני חושבת שאפשר להגדיר אותו כברונזה – אדמדם. בתוך הבית הוא יותר נראה כמו ברונזה-חום כהה, ובאור שמש אפשר לראות בבירור את האדמומיות שלו – גם הפעם, ניסיתי לצלם לכן את הלק הזה בזוויות שונות של אור, כדי שתוכלו להתרשם מההבדלים.

הלק הזה הוא פשוט מדהים ואני חושבת שהגוון שלו ממש מיוחד, לא היה לי צבע כזה לפני כן :-)
אני שמתי 3 שכבות והוא יצא אטום לחלוטין, אבל לאלו מביניכן שלא אוהבות הרבה שכבות, אפשר להסתפק גם בשתיים בקלות. בתמונות אתן רואות אותו גם עם שכבה של מייבש מעליו.

הוא נמרח בקלות – אולי בקלות מדי, וזאת היתה הבעיה שלי עם שלושת הלקים האלה. הם לכאורה מאוד נוחים למריחה, לא צמיגיים וכו', אבל משום יש להם נטייה "לברוח" במריחה לכיוון הקיוטיקל וזה די מקשה על מריחה מדוייקת. בנוסף, המברשת היא מאוד ארוכה, או אולי יותר נכון להגיד, המקל של המברשת, וכתוצאה מזה, בזמן שמורחים, אז כל הזמן יש על המקל לק שמאיים לטפטף למטה וזה די מציק ומפריע למריחה.
אבל לא להיבהל – חשוב לי לציין את הפרטים האלו, אבל זה לא משהו שהופך את זה למשימה קשה במיוחד ובסה"כ מדובר על לק די נוח, ואם בורח, תמיד אפשר לתקן אח"כ :-)

הלק הזה החזיק מעולה על הציפורניים ובאופן אישי אני חושבת ששברתי איתו שיא והלכתי איתו 4 ימים....חחחח......בלי להחליף !

ביום השני, נראה לי, החלטתי לגוון קצת והוספתי לו מדבקה חדשה שקניתי, היא היתה נראית לי ממש מתאימה ללק הזה. מה אתן אומרות ?

מקווה שעובר על כולכן סופשבוע נעים ומאחלת לכולנו שבוע חדש ומהנה שיבוא עלינו לטובה !


ORLY - Golden Maharaja


Hello Hello Hello !!
The truth is, I was sure that by this time today, I'll be finishing this mini-series, because I have SSSSOOOOOO much new stuff to show you, but I didn't managed to finish it, so the new stuff (and there are plenty !) will have to wait a couple of more days, but you forgive me, right ?

So today we're moving to the second polish in this series, the Golden Maharaja (Mary and Nail Fanatic – this is for you:-) and Charming nails - I haven't forgot you and I'm hoping to swatch Red Sea Pearl in the next two days). If you remember, I didn't buy this one at first, but after my friend warmly recommended me on it, I went to the store and bought it, and how glad I am that I did that !

I was thinking how to describe you its color, and I think that it can be defined as reddish bronze . inside, it looks more like dark bronze – brown, and in sunlight you can clearly see its reddishness – this time too, I took pictures of it in different lights, so you can see the differences.

This one is very beautiful and I think it has a unique shade, I haven't got a polish similar to this one before, and I felt "brave" for trying a new color….lol

And now to the application – this one, like all of the three in this series, is runny and it was a bit hard for me to apply it accurately. In addition, the brush of those ones, or maybe I should say the stick of the brush, is pretty long, so it seems like there is always some polish threatening to be dropped down and this is also makes the application harder. But don't panic – I had to mentioned those things, but it doesn't mean that this is a hard mission to apply it :-)
This one stays perfect on the nails and personally, I think I've broke my record with this one and stayed with it for 4 days….no changing ! lol….

On the second day, I think, I've decided to add that gold sticker, it looks to me like it would fit well to this polish, what do you say ?

I wish you all a wonderful weekend !!!

May 20, 2009

My new Orly's - Part 2

.

השבוע אנחנו בסדרת הלקים של אורלי, זוכרות ?

הלק הראשון שבחרתי להראות, הוא גם הלק הראשון מבין השלושה שבחרתי לשים על הציפורניים ונחשו איזה מהם הוא
היה ? נכון, הסגול ! חחחחחח.......

אז לסגול הזה יש שם וקוראים לו Midnight Star והוא שייך לקולקציית ה"ג'מס" של אורלי, ובשמה המלא – - Fall 2008 ORLY Gems Collection. קולקציה מקסימה שהיתה מפורסמת בטבעות הצבעוניות, דמויות אבני חן, שהגיעו עם הלקים. לצערי, כשקניתי אותם ב"אפריל", כבר לא היו עליהם את הטבעות וזה היה לי קצת חבל......ברור לי לגמרי שזאת סתם חתיכת פלסטיק, אבל עדיין, אם מוצר אמור להגיע עם מוצר נלווה, למה למכור אותו בלעדיו ? סתם מרגיז לדעתי....

בכל מקרה, עם טבעת, בלי טבעת, הסגול הזה מהמם ואפילו יש משהו בשם שלו, Midnight Star, שמתיישב לי איכשהו טוב עם הגוון המסתורי של הלק. במסתורי אני מתכוונת שבנוסף לצבע הסגול המדהים שלו, יש בו מן גוון כסוף מקסים, שמשתנה בהתאם לתאורה שנמצאים בו, וגימור מבריק שמוסיף המון לקסם שלו !

ניסיתי לצלם לכן אותו בכל מיני "פוזות" ולשים לכן יותר תמונות הפעם, כדי שתוכלו לראות בעצמכן על מה אני מדברת.

מבחינת מריחה, הוא לא הכי קל בעולם (כמו גם האחרים שקניתי), כי הוא קצת "בורח" וכמו שאני כותבת לכן תמיד, כל אלה עם המרקם המטאלי (זה קצת מטאלי) תמיד איכשהו קשים לי יותר למריחה מדויקת, אבל הוא גם לא מסובך מדי, פשוט קצת יותר תשומת לב...
שתי שכבות מספיקות לו כדי להיראות אטום ובתמונה אתם רואים אותו עם שכבה של מייבש מעליו
[
אהבתי את הלק הזה מאוד והציפורניים נראו סוווווווווף הדרך עם הלק הזה עליהן !!!


ORLY - Midnight Star


Well, Sorry it took me a while, but this week we are in ORLY series, remember ?

The first polish I chose to show you is also the first among the three, that I've applied on my nails – Midnight Star from ORLY Gems Collection – Fall 2008 – A beautiful collection that was famous with those lovely colorful rings that came with the polishes.

This one is stunning and there is even something mysterious in this one, that goes well with its name – Midnight Star – in addition to its gorgeous shade of purple, it has also a beautiful shade of silver in it, that changes according to the light, and a bright finish that adds so much to its charm!

I tried to take some pictures of it in different lights, that you can see yourself what I'm talking about.

The application here is not the greatest, because this one is a bit runny and as I always write to you here, it's always more difficult for me to work with those metallic polishes (this one is a bit metallic), but I have to say it wasn't so hard to work with, so don't get me wrong, just a bit more attention…..

Two coats is enough to get an opaque look and you can see it in the pictures with Seche top coat
I really love this on and my nails looked SSSSSSSSSOOOOOOOOOOOOO beautiful with this one on!!


May 15, 2009

My new Orly's - Part 1

.


השבוע החלטתי לפרסם כאן סדרה חדשה (או יותר נכון, מיני סדרה..חחח) של 3 לקים של אורלי שקניתי בשבועיים האחרונים.
הכל התחיל מזה, שבזמן האחרון ראיתי די הרבה פרסומים של לקים של אורלי בבלוגים השונים, אבל אם להודות על האמת, משום מה אף פעם לא נמשכתי ללקים של החברה הזאת, לא יודעת למה. גם כשניסיתי לחשוב למה היתה לי סלידה מסויימת מהחברה הזאת, לא הצלחתי להיזכר או להבין למה. אז אין לי תשובה או הסבר לתת לכן, אבל הייתי חייבת להגיד את זה.

טוב, אז ראיתי פרסומים שלא עשו לי את זה במיוחד, ויום אחד בשבוע שעבר (או שזה היה לפני שבועיים ? ) נכנסתי לחנות של אפריל והיה שם מבצע על הלקים של אורלי 1+1 (ודרך אגב, חשבתי על זה שבפעם הבאה אני צריכה לעדכן אתכן בלייב על המבצעים, נכון ? ).
מבחר גדול לא היה שם, היה סטנד קטן, אבל היו שם כמה צבעים שתפסו לי העין, ואחרי שהתלבטתי ביני לבין עצמי, החלטתי שבא לי לנסות אותם (פעם מזמן מזמן היה לי לק שלהם ומאז לא השתמשתי בהם).
המחיר המקורי שהיה רשום היה 40 ש"ח ללק (לא נסחפנו בכלל...) ובמבצע מקבלים 2 לקים ב-40, כלומר, 20 ש"ח ללק. עכשיו, 20 ש"ח ללק זה לא ברמת ה"זיל הזול", אבל אני יכולה להגיד שזה מחיר סביר ללק איכותי, וגם בהזמנות שאני עושה דרך הרשת של הלקים של החברות המובילות, זה פחות או יותר המחיר שיוצא ללק. אם אתן שואלות אותי, זה המחיר שהם גם צריכים לגבות מלכתחילה בחנויות עבור הלקים האלה, כי 40 ש"ח ללק זה ממש מוגזם לדעתי....

ואחרי שאמרתי את זה, אני יכולה להמשיך :-)היתה לי התלבטות בין כמה צבעים ובסופו של דבר בחרתי בשניים – Midnight Star (הסגול) ו- Red Sea Pearl (הורוד). חזרתי הביתה וניסיתי את שניהם ומה אני אגיד לכן, בהחלט הופתעתי לטובה ! צבעים מדהימים, מריחה בסדר גמור (לא מושלמת, אבל סבבה, אני אפרט בפוסטים הבאים) וגימור ממש יפה !

ואז......אז דיברתי עם חברה יקרה, שבנוסף לזה שהיא שותפה לכל שגעונות הלקים שלי, היא גם בשלנית מצויינת (ואם בא לכן משהו טעים, אתן מוזמנות להיכנס לבלוג שלה-http://www.tapuz.co.il/blog/userBlog.asp?FolderName=ToughCookie ) והיא סיפרה לי שגם היא בדיוק נתקלה במבצע של אורלי וקנתה את Golden Maharaja (החום) שלהם. וכמו שאתן בטח מנחשות, זה היה אחד מהצבעים שהתלבטתי לגביהם ! אז אחרי ששמעתי כמה יפה הוא, ואחרי שהיא דיווחה לי שבסופר פארם מוכרים אותו גם ב- 20 ש"ח, אבל אפשר לקנות בבודדים (לא חייבים 2 ב- 40), אז "במקרה" היה לי משהו לעשות בסופר פארם ויום- יומיים אחרי הלכתי וקניתי אותו....חחחח......מודה באשמה......
אז הנה הם לפניכן, שלושתם מקסימים והיו הפתעה גדולה מאוד בשבילי ואני מאוד מאוד מרוצה מהם – התמונות יגיעו בקרוב
מאוד !

ורק לפני שאני משאירה אתכן עם התמונות, אני חייבת להזהיר אתכן – אל תשימו בקבוקי לק מתחת לפרחים עם אבקנים ! חחחחחח........אני שמתי את הלק הסגול ליד האגרטל, והיו בו פרחים עם אבקנים כאלה (ליליות, נדמה לי) שנפלו על הבקבוק ולכלכו אותו בצהוב ולמרות שניסיתי, לא הצלחתי להוריד את הלכלוך ממנו, אתן יכולות לראות בעצמכן......אופס.....:-)
סופשבוע נעים ומהנה לכולן !!


L to r (משמאל לימין): Red Sea Pearl, Midnight Star, Golden Maharaja

Orly - Midnight Star

Orly - Red Sea Pearl


Orly - Golden Maharaja

Hi !!

I've decided that this week I'll post a new series (or more accurate – mini series…lol) of 3 new Orly's polishes I've bought in the last two weeks.


Lately, I saw many swatches of Orly's polishes, but I have to admit that I've never been attracted to this brand, I don't know why. Even when I tried to think of a reason, I couldn't find anything, but I just had to tell you this.


And some day last week (or maybe two weeks ago?) I entered one of the stores we have here, and there was a sale 1+1 on Orly's polishes – there wasn't a large selection to choose from, but I saw there couple of colors that I've wanted. Their original price was about 9 dollars each (which is a high price for my opinion), so it turned out I bought 2 polishes in 9 dollars (which is much more reasonable for my opinion).


So….I wasn't sure what polishes to choose, and eventually I chose Midnight Star and Red Sea Pearl (by the way, anybody knows what collection is this one from ? ). When I came home, I tried them both and I can tell you that I was surprise for good ! awesome colors, nice application( not perfect, but still good – I'll write about it in my next posts) and beautiful finish !


And than…..than I talked with a dear friend, whom I share my polish mania :-) but in addition, she's a great cook (and if you feel like having something yummy, you are welcome to visit her blog - http://toughcookiecookblog.blogspot.com/) and she told me she saw another sale of Orly in another store, and bought the Golden Maharaja. And you can already guess, that this was one of the colors I wanted ! so after hearing how beautiful that one is, I went to the other store and bought this one also …lol


So here they are, all adorable and were a big surprise to me and I'm very very pleased with them – their swatches will come soon :-)


And before I'll go, I have to worn you not to leave polishes bottles under flowers with stamens ! lol ….I put the Midnight Star under a vase with these kinds of flowers (Lilies I think) and they fell on the bottle and painted it with yellow, and though I tried to take it off, I didn't succeed with that…you can see it yourself….ooops

I wish you all a nice and enjoyable weekend !


twitter / Tulisnailpolish

Discounts